
Remnawave Subscription Page

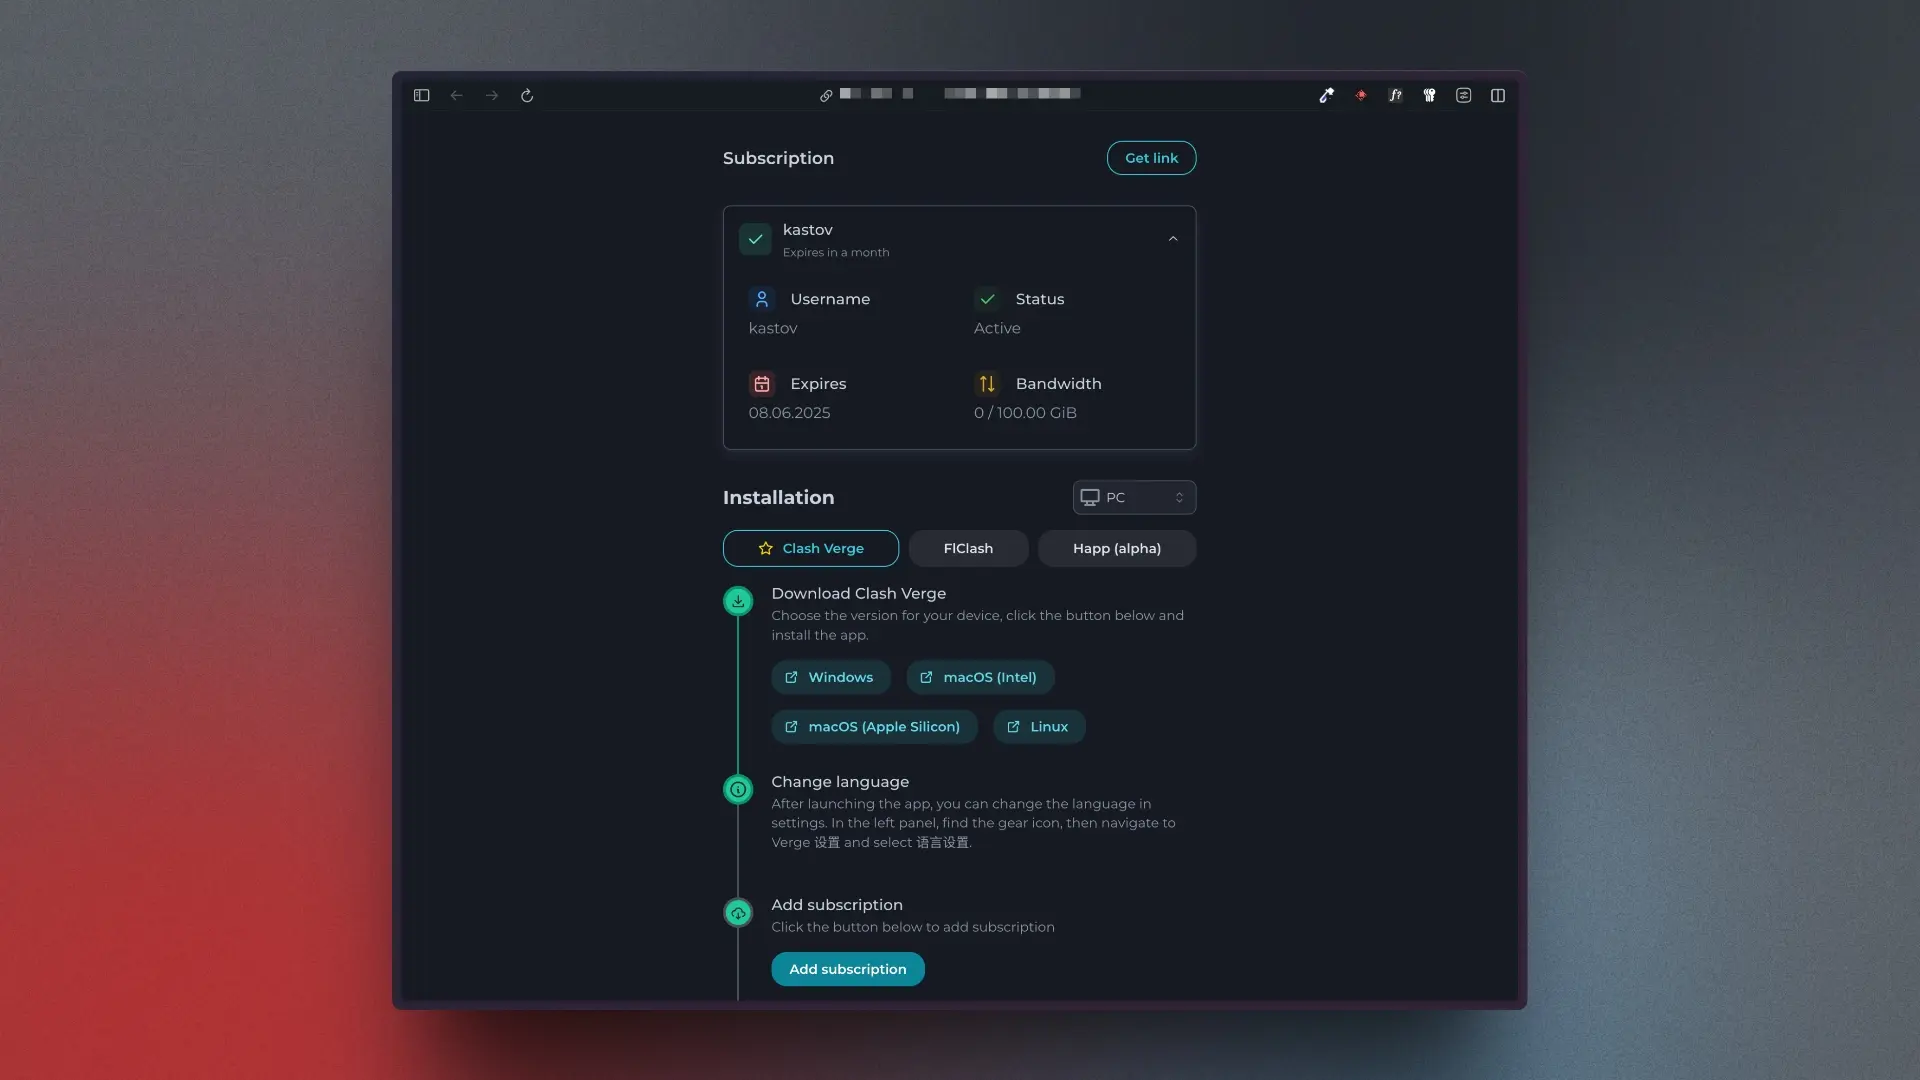
Remnawave Subscription Page is lightweight and secure way to hide your Remnawave Panel domain from end users. You can use it as a simple and beautiful subscription page for your users.

Page screenshot

Step 1 - Prepare .env file

Edit the /opt/remnawave/.env file and change SUB_PUBLIC_DOMAIN to your subscription page domain name.

Editing .env file
cd /opt/remnawave && nano .env

Change SUB_PUBLIC_DOMAIN to your subscription page domain name. Domain name must be without http or https.

.env file content
SUB_PUBLIC_DOMAIN=subscription.domain.com

Step 2 - Create docker-compose.yml file

Creating docker-compose.yml file
mkdir -p /opt/remnawave/subscription && cd /opt/remnawave/subscription && nano docker-compose.yml
docker-compose.yml file content
services:
remnawave-subscription-page:
image: remnawave/subscription-page:latest
container_name: remnawave-subscription-page
hostname: remnawave-subscription-page
restart: always
environment:
- REMNAWAVE_PANEL_URL=https://panel.com
- APP_PORT=3010
- META_TITLE="Subscription Page Title"
- META_DESCRIPTION="Subscription Page Description"
ports:
- '127.0.0.1:3010:3010'
networks:
- remnawave-network

networks:
remnawave-network:
driver: bridge
external: true
danger

Please replace panel.com with the URL at which the Remnawave Dashboard is available.

REMNAWAVE_PANEL_URL can be http (bridged Remnawave, example: http://remnawave:3000) or https (example: https://panel.com).

tip

You can replace it parameter with, for example,

- CUSTOM_SUB_PREFIX=sub

to get an additional nested path for the subscription page. But in that case, in the .env file for the remnawave container, you will need to set the corresponding parameter correctly: SUB_PUBLIC_DOMAIN=link.domain.com/sub. And you will need to specify similar changes to the valid path in your configurations for Nginx/Caddy.

Full .env file reference
.env file
APP_PORT=3010

### Remnawave Panel URL, can be http://remnawave:3000 or https://panel.example.com
REMNAWAVE_PANEL_URL=https://panel.example.com


META_TITLE="Subscription page"
META_DESCRIPTION="Subscription page description"


# Serve at custom root path, for example, this value can be: CUSTOM_SUB_PREFIX=sub
# Do not place / at the start/end
CUSTOM_SUB_PREFIX=


# Support Marzban links
MARZBAN_LEGACY_LINK_ENABLED=false
MARZBAN_LEGACY_SECRET_KEY=
REMNAWAVE_API_TOKEN=


# If you use "Caddy with security" addon, you can place here X-Api-Key, which will be applied to requests to Remnawave Panel.
CADDY_AUTH_API_TOKEN=

Step 3 - Start the container

Starting the container
docker compose up -d && docker compose logs -f

Step 4 - Configure reverse proxy

warning

Remnawave and its components does not support being server on a sub-path. (e.g. location /subscription {)

It has to be served on the root path of a domain or subdomain.

For custom path, you can use the CUSTOM_SUB_PREFIX parameter.

Caddy

Caddy configuration

If you have already configured Caddy all you need to do is add a new site block to the Caddyfile.

Editing Caddyfile
cd /opt/remnawave/caddy && nano Caddyfile
warning

Please replace SUBSCRIPTION_PAGE_DOMAIN with your domain name.

Review the configuration below, look for green highlighted lines.

danger

Do not fully replace the existing configuration, only add a new site block to the existing Caddyfile.

Add a new site block to the end of configuration file.

Pay attention to the green lines, they are the ones you need to add.

Caddyfile
https://REPLACE_WITH_YOUR_DOMAIN {
reverse_proxy * http://remnawave:3000
}
:443 {
tls internal
respond 204
}

https://SUBSCRIPTION_PAGE_DOMAIN {
reverse_proxy * http://remnawave-subscription-page:3010
}

Now you need to restart Caddy container.

docker compose down && docker compose up -d && docker compose logs -f

Caddy with security settings

tip

If you use Caddy configuration with security settings, you need to make some changes to the docker-compose file of the subscription page.

Open docker-compose.yml:

cd /opt/remnawave/subscription && nano docker-compose.yml
warning

Please use the docker container name and port (http://remnawave:3000) instead of the panel URL (https://panel.com).

Review the configuration below, look for yellow highlighted line and make the necessary changes. Then copy the entire line highlighted in green and add it to the docker-compose file.

docker-compose.yml
environment:
- REMNAWAVE_PANEL_URL=http://remnawave:3000

Now, you need to restart the Subscription Page container.

docker compose down && docker compose up -d && docker compose logs -f

Nginx

Nginx configuration

If you have already configured Nginx, all you need to do is add a new location block to your configuration file.

Issue a certificate for the subscription page domain name:

acme.sh --issue --standalone -d 'SUBSCRIPTION_PAGE_DOMAIN' --key-file /opt/remnawave/nginx/subdomain_privkey.key --fullchain-file /opt/remnawave/nginx/subdomain_fullchain.pem --alpn --tlsport 8443

Open Nginx configuration file:

cd /opt/remnawave/nginx && nano nginx.conf
warning

Please replace SUBSCRIPTION_PAGE_DOMAIN with your subscription page domain name.

danger

Do not fully replace the existing configuration, only add a new location block to your existing configuration file.

Add a new upstream block to the top of the configuration file.

Pay attention to the green lines, they are the ones you need to add.

nginx.conf
upstream remnawave {
server remnawave:3000;
}

upstream remnawave-subscription-page {
server remnawave-subscription-page:3010;
}

Now add a new server block to the bottom of the configuration file.

nginx.conf
server {
server_name SUBSCRIPTION_PAGE_DOMAIN;

listen 443 ssl;
listen [::]:443 ssl;
http2 on;

location / {
proxy_http_version 1.1;
proxy_pass http://remnawave-subscription-page;
proxy_set_header Host $host;
proxy_set_header Upgrade $http_upgrade;
proxy_set_header Connection $connection_upgrade;
proxy_set_header X-Real-IP $remote_addr;
proxy_set_header X-Forwarded-For $proxy_add_x_forwarded_for;
proxy_set_header X-Forwarded-Proto $scheme;
proxy_set_header X-Forwarded-Host $host;
proxy_set_header X-Forwarded-Port $server_port;

proxy_send_timeout 60s;
proxy_read_timeout 60s;
}

# SSL Configuration (Mozilla Intermediate Guidelines)
ssl_protocols TLSv1.2 TLSv1.3;
ssl_ciphers ECDHE-ECDSA-AES128-GCM-SHA256:ECDHE-RSA-AES128-GCM-SHA256:ECDHE-ECDSA-AES256-GCM-SHA384:ECDHE-RSA-AES256-GCM-SHA384:ECDHE-ECDSA-CHACHA20-POLY1305:ECDHE-RSA-CHACHA20-POLY1305:DHE-RSA-AES128-GCM-SHA256:DHE-RSA-AES256-GCM-SHA384:DHE-RSA-CHACHA20-POLY1305;

ssl_session_timeout 1d;
ssl_session_cache shared:MozSSL:10m;
ssl_session_tickets off;
ssl_certificate "/etc/nginx/ssl/subdomain_fullchain.pem";
ssl_certificate_key "/etc/nginx/ssl/subdomain_privkey.key";
ssl_trusted_certificate "/etc/nginx/ssl/subdomain_fullchain.pem";

ssl_stapling on;
ssl_stapling_verify on;
resolver 1.1.1.1 1.0.0.1 8.8.8.8 8.8.4.4 208.67.222.222 208.67.220.220 valid=60s;
resolver_timeout 2s;

proxy_hide_header Strict-Transport-Security;
add_header Strict-Transport-Security "max-age=15552000" always;

# Gzip Compression
gzip on;
gzip_vary on;
gzip_proxied any;
gzip_comp_level 6;
gzip_buffers 16 8k;
gzip_http_version 1.1;
gzip_min_length 256;
gzip_types
application/atom+xml
application/geo+json
application/javascript
application/x-javascript
application/json
application/ld+json
application/manifest+json
application/rdf+xml
application/rss+xml
application/xhtml+xml
application/xml
font/eot
font/otf
font/ttf
image/svg+xml
text/css
text/javascript
text/plain
text/xml;
}

Now lets modify the docker-compose.yml for Nginx to mount the new certificate files.

cd /opt/remnawave/nginx && nano docker-compose.yml
docker-compose.yml
services:
remnawave-nginx:
image: nginx:1.26
container_name: remnawave-nginx
hostname: remnawave-nginx
volumes:
- ./nginx.conf:/etc/nginx/conf.d/default.conf:ro
- ./fullchain.pem:/etc/nginx/ssl/fullchain.pem:ro
- ./privkey.key:/etc/nginx/ssl/privkey.key:ro
- ./subdomain_fullchain.pem:/etc/nginx/ssl/subdomain_fullchain.pem:ro
- ./subdomain_privkey.key:/etc/nginx/ssl/subdomain_privkey.key:ro
restart: always
ports:
- '0.0.0.0:443:443'
networks:
- remnawave-network

networks:
remnawave-network:
name: remnawave-network
driver: bridge
external: true

Now you need to restart Nginx container.

docker compose down && docker compose up -d && docker compose logs -f

Traefik

Traefik configuration

If you have already configured Traefik, you need to create a new dynamic configuration file called remnawave-sub-page.yml in the /opt/remnawave/traefik/config directory.

cd /opt/remnawave/traefik/config && nano remnawave-sub-page.yml

Paste the following configuration.

warning

Please replace SUBSCRIPTION_PAGE_DOMAIN with your subscription page domain name.

Review the configuration below, look for yellow highlighted lines.

remnawave-sub-page.yml
http:
routers:
remnawave-sub-page:
rule: "Host(`SUBSCRIPTION_PAGE_DOMAIN`)"
entrypoints:
- http
middlewares:
- remnawave-sub-page-https-redirect
service: remnawave-sub-page

remnawave-sub-page-secure:
rule: "Host(`SUBSCRIPTION_PAGE_DOMAIN`)"
entrypoints:
- https
middlewares:
tls:
certResolver: letsencrypt
service: remnawave-sub-page

middlewares:
remnawave-sub-page-https-redirect:
redirectScheme:
scheme: https

services:
remnawave-sub-page:
loadBalancer:
servers:
- url: "http://remnawave-subscription-page:3010"

Step 5 - Usage

The subscription page will be available at https://subdomain.panel.com/<shortUuid>.

Configuring subscription page (optional)

You can change available apps and their texts with editing the app-config.json file.

app-config.json interface
export interface IAppConfig {
id: `${Lowercase<string>}`
name: string
isFeatured: boolean
isNeedBase64Encoding?: boolean
urlScheme: string
installationStep: {
buttons: {
buttonLink: string
buttonText: {
en: string
fa: string
ru: string
}
}[]
description: {
en: string
fa: string
ru: string
}
}
addSubscriptionStep: {
description: {
en: string
fa: string
ru: string
}
}
connectAndUseStep: {
description: {
en: string
fa: string
ru: string
}
}
additionalBeforeAddSubscriptionStep?: {
buttons: {
buttonLink: string
buttonText: {
en: string
fa: string
ru: string
}
}[]
description: {
en: string
fa: string
ru: string
}
title: {
en: string
fa: string
ru: string
}
}
additionalAfterAddSubscriptionStep?: {
buttons: {
buttonLink: string
buttonText: {
en: string
fa: string
ru: string
}
}[]
description: {
en: string
fa: string
ru: string
}
title: {
en: string
fa: string
ru: string
}
}
}

export interface IPlatformConfig {
ios: IAppConfig[]
android: IAppConfig[]
pc: IAppConfig[]
}

This guide explains how to add client applications for different platforms to the Remnawave subscription page.

Configuration Structure

Create a file named app-config.json with the following structure:

{
"ios": [
/* iOS app configurations */
],
"android": [
/* Android app configurations */
],
"pc": [
/* Desktop app configurations */
]
}

Each platform contains an array of application configurations that follow the IAppConfig interface.

Application Configuration Properties

PropertyTypeRequiredDescription
idstringYesUnique lowercase identifier for the app
namestringYesDisplay name of the application
isFeaturedbooleanYesWhether the app should be featured in the UI
isNeedBase64EncodingbooleanNoWhether the subscription URL needs Base64 encoding
urlSchemestringYesURL scheme for launching the app with subscription
installationStepobjectYesInstructions for installing the application
addSubscriptionStepobjectYesInstructions for adding a subscription
connectAndUseStepobjectYesInstructions for connecting to VPN
additionalBeforeAddSubscriptionStepobjectNoOptional additional steps before adding subscription
additionalAfterAddSubscriptionStepobjectNoOptional additional steps after adding subscription

Localization

All user-facing text supports multiple languages:

"description": {
"en": "English text",
"fa": "Persian text",
"ru": "Russian text"
}

Example App Configuration

Here's a simplified example for one application:

{
"id": "happ",
"name": "Happ",
"isFeatured": true,
"urlScheme": "happ://add/",
"installationStep": {
"buttons": [
{
"buttonLink": "https://apps.apple.com/us/app/happ-proxy-utility/id6504287215",
"buttonText": {
"en": "Open in App Store",
"fa": "باز کردن در App Store",
"ru": "Открыть в App Store"
}
}
],
"description": {
"en": "Open the page in App Store and install the app.",
"fa": "صفحه را در App Store باز کنید و برنامه را نصب کنید.",
"ru": "Откройте страницу в App Store и установите приложение."
}
},
"addSubscriptionStep": {
"description": {
"en": "Click the button below to add subscription",
"fa": "برای افزودن اشتراک روی دکمه زیر کلیک کنید",
"ru": "Нажмите кнопку ниже, чтобы добавить подписку"
}
},
"connectAndUseStep": {
"description": {
"en": "Open the app and connect to the server",
"fa": "برنامه را باز کنید و به سرور متصل شوید",
"ru": "Откройте приложение и подключитесь к серверу"
}
}
}

Optional Fields

Additional Steps

You can provide additional instructions before or after adding a subscription:

"additionalBeforeAddSubscriptionStep": {
"buttons": [
{
"buttonLink": "https://example.com/guide",
"buttonText": {
"en": "View Guide",
"fa": "مشاهده راهنما",
"ru": "Посмотреть руководство"
}
}
],
"description": {
"en": "Make sure to grant all required permissions",
"fa": "اطمینان حاصل کنید که تمام مجوزهای لازم را اعطا کرده‌اید",
"ru": "Убедитесь, что предоставили все необходимые разрешения"
},
"title": {
"en": "Permissions",
"fa": "مجوزها",
"ru": "Разрешения"
}
}
"additionalAfterAddSubscriptionStep": {
"buttons": [
{
"buttonLink": "https://example.com/guide",
"buttonText": {
"en": "View Guide",
"fa": "مشاهده راهنما",
"ru": "Посмотреть руководство"
}
}
],
"description": {
"en": "Make sure to grant all required permissions",
"fa": "اطمینان حاصل کنید که تمام مجوزهای لازم را اعطا کرده‌اید",
"ru": "Убедитесь, что предоставили все необходимые разрешения"
},
"title": {
"en": "Permissions",
"fa": "مجوزها",
"ru": "Разрешения"
}
}

Base64 Encoding

Some applications require the subscription URL to be Base64 encoded:

"isNeedBase64Encoding": true

Mounting custom template

This can be helpful if you want fully change UI of the subscription page.

Template Variables

Your HTML template must include three variables:

VariableDescription
<%= metaTitle %>Will be resolved as META_TITLE (from .env)
<%= metaDescription %>Will be resolved as META_DESCRIPTION (from .env)
<%- panelData %>Base64‑encoded data (string), exactly matching the response from the /api/sub/<shortUuid>/info endpoint.
Example of using panelData
let panelData
panelData = '<%- panelData %>'
try {
panelData = JSON.parse(atob(panelData))
} catch (error) {
console.error('Error parsing panel data:', error)
}
danger

After mounting your template, ensure all three variables are present and used correctly in your code. If so, your subscription page will work out of the box without any further modifications.

Restart the subscription-page container to apply the changes.

docker compose down && docker compose up -d && docker compose logs -f

Custom app-config.json (custom apps)

Modify your docker-compose.yml file to mount the app-config.json file to the subscription-page container:

volumes:
- ./app-config.json:/opt/app/frontend/assets/app-config.json

Restart the subscription-page container to apply the changes.

docker compose down && docker compose up -d && docker compose logs -f

Full Example

See the complete example to understand how to configure multiple applications across different platforms.